Untuk mempermudah development, biasanya saya menggunakan virtual host. Nah cara membuatnya cukup mudah, hanya beberapa langkah sederhana cukup dengan menggunakan notepad atau notepad++ atau text editor lainya.
Langkah2 nya adalah sebagai berikut:
- Mengedit File hosts windows di folder C:\Windows\System32\drivers\etc (Asumsi Instalasi Windows di Drive C:)
- Mengedit file httpd.conf
- Mengedit File httpd-vhosts.conf
1. Mengedit File
hosts
windows di folder C:\Windows\System32\drivers\etc (Asumsi Instalasi Windows di Drive C:)
Karena File hosts ini berada di system, dan port yang digunakan biasanya adalah port 80 dimana port ini digunakan oleh beberapa program yang berada di windows, untuk mempermudah, maka copy terlebih dahulu file hosts ke folder lain, kemudian edit seperti ini
# Copyright (c) 1993-2009 Microsoft Corp.
#
# This is a sample HOSTS file used by Microsoft TCP/IP for Windows.
#
# This file contains the mappings of IP addresses to host names. Each
# entry should be kept on an individual line. The IP address should
# be placed in the first column followed by the corresponding host name.
# The IP address and the host name should be separated by at least one
# space.
#
# Additionally, comments (such as these) may be inserted on individual
# lines or following the machine name denoted by a '#' symbol.
#
# For example:
#
#      102.54.94.97     rhino.acme.com          # source server
#       38.25.63.10     x.acme.com              # x client host

# localhost name resolution is handled within DNS itself.
#	127.0.0.1       localhost
#	::1             localhost

127.0.0.1       localhost
127.0.0.1       virtual-host-yang-kita-buat.dev
Selanjutnya save, dan paste file hosts yang telah anda copy dan edit tadi ke dalam folder C:\Windows\System32\drivers\etc (Asumsi Instalasi Windows di Drive C:)
2. Mengedit file httpd.conf
File ini berada di folder wamp server anda misalnya E:\wamp\bin\apache\apache2.4.9\conf
Dimana :
E : Adalah drive tempat anda menginstall WAMP server
apache2.4.9 : adalah apache version yang anda gunakan saat ini:
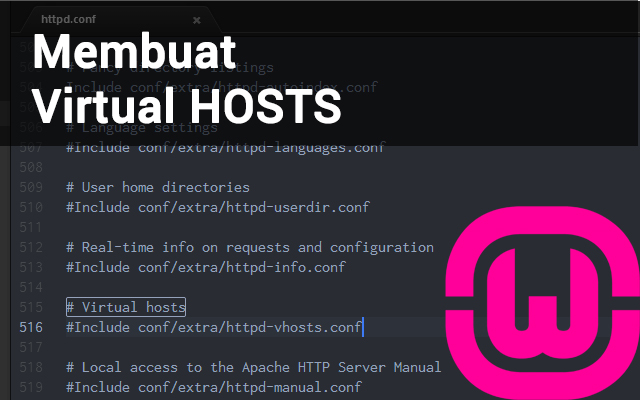
Cari text # Virtual hosts
dibawahnya akan ada text seperti gambar dibawah ini :
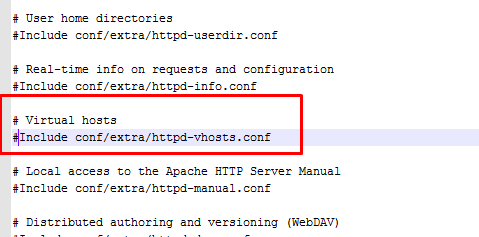
Save
3. Mengedit File httpd-vhosts.conf
File httpd-vhosts.conf berada di dalam folder E:\wamp\bin\apache\apache2.4.9\conf\extra
edit atau paste code ini di bagian paling bawah
<VirtualHost *:80>
 ServerAdmin contohemail@gmail.com
 DocumentRoot "E:\wamp\www\bootstrap"
 ServerName bootstrap.dev

</VirtualHost>
Simpan
Restart Apache anda, dan sekarang coba buka virtual-host-yang-kita-buat.dev di browser.
Semoga sukses.